
I had an interesting childhood – my Dad and I were a lot alike, and when I was growing up he jumped with both feet into the world of rope courses – he single-handedly built several small courses in Tennessee which, coupled with his work as a Park Ranger fed my infatuation with survival techniques and self-reliance.
I spent a lot of time as a pre-teen and teenage years tying knots and lighting fires and I want to spend more time getting back to that as I learned a lot, had a lot of fun, and want to refresh my skills with you so I am ready when Tell gets big enough to keep the rope ends out of the dirt long enough for me to teach him.
I am going to start with the bowline, the bowline is one of the four basic maritime knots (along with the figure eight, reef knot, and clove hitch) and is a very simple knot used to form a fixed loop in the “bitter end” of a rope (the working end). It is an essential knot for an outdoorsman to know, especially if you climb or sail.
Like the majority of “good” knots, it is easy to tie and untie. Also like many good knots, if tied improperly it can collapse (capsize).
Anytime you tie a knot in a rope you reduce its strength through bending, the better the knot the less strength you lose, and a properly tied bowline retains about 65% of it’s strength. Because of this the FFA recommends to tie down light aircraft. More importantly, the bowline is commonly used as a rescue knot for conscious individuals that fell into holes or off cliffs. (because of this I will show you how to tie one using a single hand in-case you are injured or want to show off)
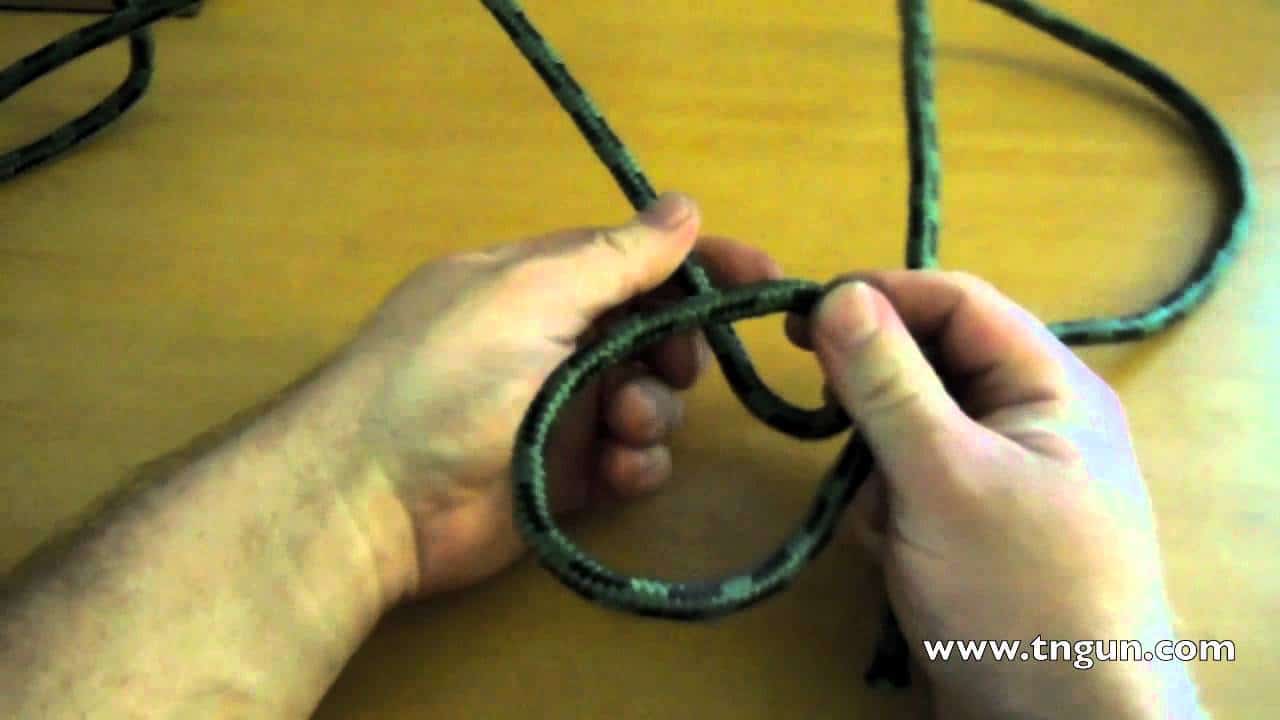
Procedure for Tying
Most people learn to tie a bowline using a mnemonic aid.
If you think of the end of the rope as a rabbit, the loop as the rabbit’s hole, and the standing end of the rope above the loop as a tree…
The rabbit comes up through the hole, round the tree from the right, and back down the hole.
It is very important that the loop is formed correctly, with the bitter end on the top of the loop.
If you reverse the loop (shown in the video) you will make an Eskimo bowline, then when the bowline is put under pressure the bowline will slip.
One Handed
If you have the rope secured so you can make it taut, you can tie this knot one handed.
Simply hold the bitter end in your hand.
Lay your palm on the top of the rope (the tendency is to use your wrist which is easier, but will probably trap your hand)
Twist your hand down on the left side of the rope, down, under and back up on the right side of the rope. This makes the loop.
Use your fingers to pass the rabbit around the tree from right to left.
While still holding the end of the rope, pull it and your hand through the loop
Tighten.
With practice you can do this easier than you can tie the rope one handed.
Let me know if you want to see more knot videos, I am probably going to do some anyway, but the detail and amount of will depend on you.
The Morrow Guide to Knots: for Sailing, Fishing, Camping, Climbing