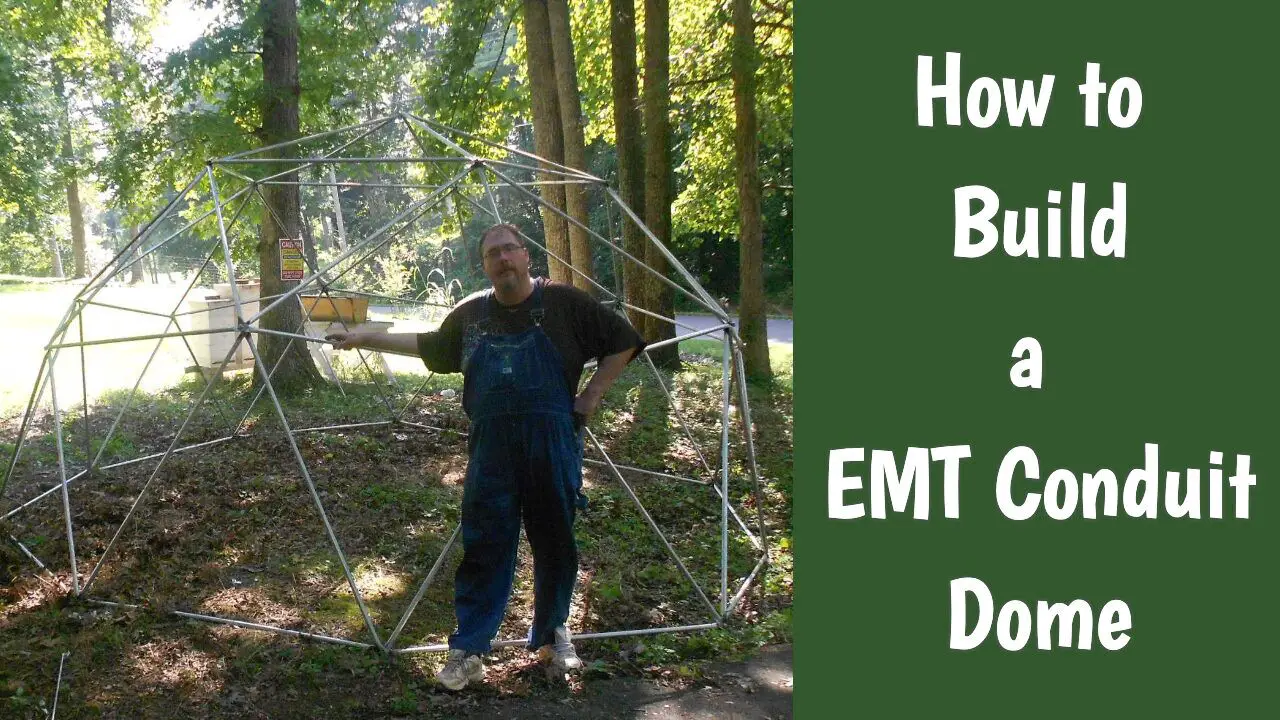
If you ever wanted to build a Geodesic Dome this is the place to be!

This Geodesic Dome article used to be to be a series of 5 articles. Each a small part of showing how I made a cement covered EMT Conduit Geodesic Dome shown on the last season of Doomsday Preppers. I was planning on building this dome and when NatGeo offered to buy all the cement if I allowed them to tape it I reluctantly agreed.
There are a lot of ways to build a geodesic dome, and I am pretty fascinated by them. I want to build many different types and right now, I am collecting materials and skills to build a bamboo dome pavilion using bamboo and aircrete.
At some point I want to make a wooden greenhouse geodome. Unfortunately my cutting skills and carpentry knowledge is just not up to the task at this point. Plus, I still hold out on figuring out a way to convince the Hickman County zoning board to allow me to build a commercial range on my land. I really think the county needs a place to run handgun permit classes. Unfortunately the layout of my land is such that the best place to put a huge geodesic greenhouse is also the best place for a pistol range.
Cutting the Conduit for the Geodesic Dome
First off, geodesic domes are amazing marvels of engineering. No other man made structure covers more cubic feet for less material than a dome. A Geodesic dome is amazingly strong. Once coated with cement they are extremely disaster resilient.
Domes are inherently stable, and as you assemble yours you will find that the triangles that make up the dome are under constant tension. This is what contributes to the strength.
Domes are best described by their frequency (historically denoted by the Greek letter V). Frequency describes how much division are in the dome.
(best described here http://www.geo-dome.co.uk/article.asp?uname=domefreq). It helps to think of a dome as a collection of triangles.
If you use a few triangles you will get something like a dome. However it will be a funny looking box.
Divide the triangle into smaller triangles and push the connections outward and it will look better. The more divisions you have the closer you get to a true dome.
If you put a dividing line in the center of the 1v triangle, it would break the 1v dome into a 2v dome (and would make it more complicated,
Split it once more, you get a 3v dome.
The more you divide the stronger the dome. However, it will make the math more complicated. Additionally, the more v you add, you have more strut sizes to cut.
I made this cement covered dome using relatively inexpensive electrical metallic tubing or (emt).
A small 2v dome is simple
If you stay small a 2v dome is simple. My 16 foot diameter 2v dome allows me to use 10 foot conduit cut into two pieces with very little waste. One 4.7ft and one 5.3 ft section can be cut out of a single 1 foot pipe. You need 30 and 35 individual pieces respectively. This means my dome only needed 35 sections of 10 ft pipe and only had 5 4.7ft leftover pieces.
The same size dome in 3v needs 30 2.8ft pieces, 40 40 3.28 pieces, and 50 3.30 pieces
A 6v dome needs 9 different sizes and 555 different sections while a 6v dome is much stronger, and more rounded – I am satisfied the simplicity of my 2v dome.
It took me a while to figure out the .3 and .7 of a foot. Rather than get into complicated math, I simply bought an engineer’s tape measure. It has SAE measurements of ½, ¾, and the rest on one side and then decimal feet on the other. Instead of each foot being divided into 12 segments, and engineer tape is divided into 10 segments.
It was easy to find at the hardware store, and cost the same as a normal tape.
Cutting EMT Conduit
When you cut your struts ad whatever length your calculator gives and ad one and a half inches. This allows you to drill your holes 3.4 inch from the pipe ends and still meet your length of strut.
You can use a hacksaw, but I found a LARGE pipe cutter was much easier.
The larger the better, and a pipe cutter made it easy to get exacting cuts.
To make it easier, I made a jig. I took an 8 ft 2×4, marking a line down the entire length at 1/3 and 2/3rd dividing it into thirds.
Next I set table saw blade at a 45 degree angle. Then I made shallow cut and slicing down the line, flipped it over and repeated the process. This made a “v” shaped cut. I then cut the board at 6 foot. Then I made a stopper by screwing a section of 2×4 to the end, and measured from the stopper to 4.7 inches and 5.3.
This allowed me to make exact marks on each pipe to ensure they were all cut the same length.
Once all the pipes were cut, I then took a sharpie and marked the weld lines, and a mark about an inch and a half from each end.
After all of the pipes were cut and marked I was ready to change my jig around and get into the smashing and drilling of the ends of the pipe.
Conduit Dome Pipe Smashing

There are many ways you can flatten the strut ends aka “conduit dome pipe smashing”. You could hammer them, use a large shop vice, or use a hydraulic press. I have read that the vice method is destructive to the vice. I tried it and found it was too much work.
It took me so long to start this project, as I was saving up for a 12 ton shop press specifically for this project.
I used a sawhorse to set my 2×4 jig parallel to the ground with one end under the end of the press.
My jig was modified and thinned down one end about 4.1 inches from the stop. This allowed me to place one arbor plate on the 2×4 and line up one end of the plate with the line I marked 1.5 inches from the end /
That way, each pipe was smashed the exact same amount. Using the arbor plate also allowed me to smash the end with a curve, instead of straight across. This made each end stronger.
Be Careful Where You Smash
I have read that you should not have the weld in the center or on the side of your flattened end. This can cause it to crack. Since I took the step of marking the weld I simply rotated it 45 degrees from the press. This put the weld about 1/3 of the way on the flat end.
On the desert domes site, they smashed one end of every piece of conduit then drilled it. They used a bolt screwed into the jig to ensure the other end got flattened on the same plane.
That method was used on the first 10, but found and was easier and faster method. I smashed one end, flipped it over, laid it in the grove, and carefully smashed the other end. Of course I was ensuring that I only tightened it after ensuring that everything was lined up. It was not as exact, but it was MUCH easier.
Drill the Ends
Once the ends were smashed, I took down the jig, and set it on my drill press and clamped the jig down. This ensured that the hole would be drilled in the center of the flattened conduit end ¾ of an inch from the end.
I used high quality titanium drill bits, but still 2 were burnt up drilling the 130 holes.
Once all the pipes were drilled I painted the ends. My thought was to prevent rust where I drilled through the zinc coating.. However the real value came during assembly where it made it easy to identify the lengths of pipe.
EMT Conduit Geodesic Dome Assembly

When I made my first dome I found the website Desert Domes to be the most help.
He used the colors blue and red for his dome. I used White and Black for my struts because the paint was several dollars cheaper.
For my assembly diagram I used black and green since white doesn’t show up very well on a white background…
In both the diagram and in my actual construction I used black to designate the long studs. In this case 5.3 feet long.
The Green lines in the diagram represent the short lengths – 4.3 feet long.
You will need 35 black sections and 20 Green/White sections.
I have heard that some people start at the bottom and work up. In my experience I find starting at the top and working down works best for me.
If you look carefully you will see that a 2v dome is 6 pentagons bolted together, its not assembled that way, but 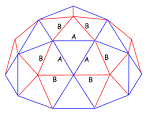 knowing that might make it easier to visualize.
Process
- To start, take 5 short struts and bolt them together.
- Next take 5 long struts and bolt them to the free ends of your short struts.
- Keep everything loose, because as you get closer to having all the short struts bolted to the long struts the center vertices of 5 short struts will have to bow outward.
- At each corner of your pentagon, lay out 2 long and one short strut. (Keep the short strut between the two longer struts.)
- Now, taking each corner at a time, unbolt a corner and add the black-green-black struts, and bolt.
- Don’t tighten the bolts; it is much easier if you keep everything loose until ALL the struts are connected.
- If you start at a corner, you will notice that the struts are in the pattern 2 black, 1 green, two black – 1 green – all the way around. Bolt the side by side black struts together – so you will have 5 triangles and 5 short struts radiating out from your pentagon.
- Lay out 10 short struts around your dome.
- Bolt two to the point of each triangle you made in the last step.
- Next bolt the free ends of the struts to the short struts from the last step.
- As you do this the structure will start to “stand up” – I found that it is easier if you have help to lift the top of the structure up, freeing me to pull the struts together.
This part can get a little complicated so feel free to look at the diagram as much as needed.
For the next step you will need 10 long struts and 10 short struts.
- Look at the base of structure at each bolt and you will either see 3 short struts (green/white) bolted together OR 2 long struts (black) connected to 2 short (green/white) struts.
- At every position with the three short struts lay down 2 more short struts.
- Every position where there are 4 struts (2 long, 2 short) lay down 2 long black struts.
- Bolt them together in the same way you have done in all the previous steps – knowing that by this time the dome is wanting to stand up – You can do this yourself – but extra hands makes this MUCH easier.
Lastly lay out the last 10 long struts around the base.
These 10 black struts are your base. It is easiest to start by connecting a short and long strut from the previous step. I make a triangle with one of the base struts coming off each side. I then skip the next long and short struts and repeat.
That way I can control the lifting of the dome, and I don’t have to lift the entire 150 pounds of conduit pipe each time.
As you come back and connect the struts you skipped, take particular care to ensure that center of each pentagon of short struts is pushed outwards. When we did this the first time, I did not check. While bolting the struts some were pushed inward causing me to have to unbolt entire sections to fix it.
Once everything is assembled you can now tighten the bolts.
You will find that at each connection the dome is incredibly strong. Remember it is only thin walled conduit. The individual pipes are not that strong. I can easily climb the structure if I stay at the connections. When I did a pull up in the center of a bar it bent.
EMT Conduit Geodesic Dome Door

When figuring out the Conduit Dome Door I got the basic idea from my test build in my front yard. My Dad came to help me build the actual cement dome he brought a lifetime of construction experience that I just don’t have.
We fiddled around and came up with an idea that I am very happy with. Due to the time constraints of the film crew we did not write down any measurements. I could not take video of it.
However, with the pictures I made on the computer and the experience you will have building the dome, I am sure you can figure it out.
Besides the dome itself, you will need one of the extra 4.3 foot struts, some plumber strap, some nails, and 2×6 boards for the door frame.
We will be working with one of the pentagons.
Pick one that faces the direction you want your door to face (lift the dome and rotate it if needed).
Unbolt the center bolt. Loosen, but do not remove the bolts on the other ends of the struts making the pentagon.
Next bend the struts outward, as shown in the picture to the right.
Connect the 6 struts into 3 triangles, one at the top, and one on each side of the doorway.
If you want to measure and cut extra conduit you can connect the triangles, but we are just using this to connect to a wood door frame, and are going to wrap welded wire fence over the wood, we elected to leave the triangles “loose”.
Frame in the door using traditional carpentry techniques.
We attached the door frame to the conduit pipe using galvanized pipe strapping tape.
This isn’t Exact Science – at least not for me
We also did not follow this picture exactly, as we did not attach the top 2 struts to the corner. Instead we made a triangle that stuck out about 8 inches from the center of the door frame. My goal is to use this to attach a security camera or light to this, as well as to make a small overhang to reduce rain on whoever is unlocking the door.
We had not leveled the frame yet, nor finished wrapping all the wire to the frame.
You can, however, see the top triangle sticking out over the door frame.
Something I did not take pictures of, but I think is very important was we took steps to strengthen the door.
In my opinion, there is no sense in making a hardened building with a weak door. A door is only as strong as it’s frame. If the only thing holding my frame in the cement dome was a couple inches of pipe hanger, than a few blows with a sledge will take it out.
Once the door frame was mounted in the 2×6 frame, we drilled several 3/8 holes through the outer and inner frame.
Next we threaded long (over a foot long) carriage bolts and bolted the two frames together using a large washer and a locking nut.
We then threaded on other nuts and sandwiched in more large washers on the bolts to give purchase to the cement.
A lot of rebar tie wire was used to connect the long bolts to the fencing and poultry netting.
Our hope is that the cement will bond to the bolts as it does with re-bar so that the door is integrated with the cement dome.
Adding Support Wire and Cement to the EMT Conduit Geodesic Dome

This was the hardest part of the entire Conduit Geodesic Dome Wire and Cement project so far. It was my first attempt at working with cement. (other than using a couple bags of ready mix to set fence poles).
To make matters worse, We were being filmed by a crew from Doomsday Preppers so we were on an extreme time limit. (Basically we had one day to do all the cement work). I only had one helper (Thanks Dad), and my mixer kept breaking.
All in all, I am pleased with the outcome, and learned a lot about what to do, what not to do, and how I would do it if I ever do it again….
What we did up to this point was to build out dome and frame in the door.
Our intent is to cover the geodesic dome using a concept called ferro-cement (FC). In ferro-cement you don’t have to use as much cement to cover a structure because you are using more structural wire – the ideal is chicken wire every ¼ inch or stucco mesh.
In most instances of using FC workers use a thick mix of Portland cement and sand 1/3 ratio, and work against each other to press a low slump (little water) mix against the wire.
Mortar Sprayer Saves the Day
This is very labor intensive, and since I just did not have time, I contacted Nolan Scheid from Mortar Sprayer.com and got his air powered sprayer.
I will say, that in my ignorance I did most everything wrong at LEAST once, but his Sprayer enabled me to complete the job on time (well, that and my Dad’s labor)
This article isn’t designed to be an advertisement for his sprayer, but I cannot express how vital it was to this process.
That being said, since my budget was too small to afford stucco mesh or enough chicken wire to wrap it 4 times to get the ¼ inch between wires, and I did not know about spider lath at the time of my project.
I was worried about the sprayed cement blowing through the wire. (I learned later that it depends a lot on your technique). So I gave into my fears somewhat by adding some surplus billboard tarps I bought online. These tarps are old vinyl billboards and are extremely thick and durable.
I originally got these for a pond project, but I was too lazy to hand dig it. I think I got them for under $30.
My Plan for the Geodesic Dome Covering Changed
My original plan was to wrap the dome in welded wire fencing, then the tarp, then the chicken wire. However, we began over thinking and changed to covering the frame with the tarp, then fencing, then the 1 inch poultry netting. This was a mistake.
The thought was that this would allow the cement to get the benefit of the extra iron in the fencing. This caused problems when we started spraying (more about that later.)
The way we used the fence wire was to divide the ground perimeter of the dome (54 feet) in half and cut the welded fencing wire into 27 foot (plus a little extra) sections.
We allowed the wire to roll back up into a loose roll. Next we bent one end back about 6 inches, pressed it under the base of the dome, and the used long poles to push the roll up and over the highest point of the dome.
We did this several times, each time pushing several inches of each end under the base of the dome to give us attachment points when we pour the slab.
Dad and I also pulled the fence wire as tight as we could to keep it tight against the dome frame.
We cut left over fencing wire into 5 or 6 ft. lengths and attached that wherever the long rolls did not overlap.
To make a door we also took a section about 15 ft. long and rolled it over the door frame section which made an “igloo” type door.
It was hard to keep everything tight and round. Dad did a wonderful job of pressing down on the raised sections using a 2x2ft section of plywood and tied everything down smooth while perched on a walk-board. (I blame my dislike of heights on watching too much MacGyver in middle school)…
Wire Wrapping is Hard
Next we wrapped one 55 ft. length of fence wire around the base, and the forced it to fit the frame. The wire will want to stand straight up, but the dome slopes inward.
It took a lot of fighting and much wire to get the wire nice and flat.(we used a whole 1000 tie bundle of rebar wire ties on this small dome.)
The burlap roles that are supposed to “camouflage” the building, took away the work to make the dome smooth. Inside the dome however, a much smoother surface appears.
Before we added the chicken wire, we installed the two water bottle skylights.
The bottles don’t look all that nice, and I got a lot of questioning glances from both the film crew. When the cement dried, and we took off the plastic bags we put on it while spraying cement, everyone was amazed at how well it worked.
We also used this time to install some plastic conduit so that we can later run electricity to the building. I plan on eventually adding a solar panel over the door.
The last adventure in building gizmos was to create a “rain catchment system”.
The Doomsday Prepper guys were the big push for this. I was not really sold on the idea, but I like to please.
In doing my ferrocement research I found a cool website where a guy added planters to his dome (this is an awesome idea and is worth a look).
I figure that if my rain catchment system fails (and since it is not level it WILL fail). I will use it to plant blackberries or Muscadine grapes to cover up the dome.
Next we wrapped the entire dome in Chicken wire, doubling it up so as to get as close as we could to a wire every ¼ inch.
It took us two full days to get to this part. In reality, it should not have taken this long, but we had to work with the film crew. We also had to re-shoot several key parts over and over to give the editors things to work with. I am not complaining , just giving an overview of why a 1 day job took 2.
We did get to mix ONE load of cement that first day. It was the first time I had ever mixed cement. I was unfamiliar with how to use a cement mixer.
However, the result would have been comical if I was not worried about getting the dome done on time. (note – I was not worried about finishing the dome . I knew that would happen. I just did not want the film crew to leave and have it edited to look like a failure).
Luckily for my stress level, the next day the film crew had to film someone else, leaving my Dad and I one whole day to work the cement.
Unfortunately my mixer broke after just a couple of batches.
(While the instructions on the Harbor freight mixer do not mention it put Loctite and a lock washer on the driveshaft that runs the actual mixer barrel– both sides)
Location, Location, Location
Being out in the COUNTRY going to the nearest hardware store took an hour and a half. During which time, my Dad hand mixed the cement to the specifications mentioned on Nolan’s Mortar Sprayer website. His cement worked MUCH better than mine.
We were able to spray the concrete using the sprayer, and it saved our bacon. I mentioned earlier my change in the structure caused problems when we began to spray.
What happened was that any cement that blew through the wire. (I started with too the PSI set too high, and did not have the sprayer close enough to the wire).
The cement then collected on the tarp causing it to bulge out away from the wire. I should have gone with the original plan.
If found that by getting closer to the wire, more stuck to it, but since I was running out of time. The camera crew wanted the dome to be camouflaged to look like a boulder. Hey look, a boulder; I wonder how it got the skylights, solar panels, and big metal door…
I wrapped burlap into the chicken wire which helped catch the sprayed mortar. It also allowed me to sculpt the dome so that it had “wrinkles” and boulder like features. This did have an effect on the strength of the dome.
After the dome cures, I will tear out the tarp and spray and plaster the inside of the dome with more cement so that I get more cement into the wire. Hopefully this will make up for the strength I lost.
Luckily we were able to get everything done in time. I thought I would have Friday morning for last minute touch ups, buy the film crew hired a painter.
He did a great job, and used all sorts of nice grey shades, so instead of a nice cement grey “boulder” we have a nice painted grey “boulder”
The project came out well for the cost and effort. Until that happens, it have me a lockable space to keep tools and camping materials.
Doomsday Dome Hangout
Other Geodesic Dome Projects